写在开头
扩容是一个特别耗性能的操作,因此建议使用HashMap时,尽量指定一定大小的初始容量
HashMap是线程不安全的,并发环境中建议使用ConcurrentHashMapJDK8中引入的红黑树优化了大量hash碰撞时的性能
HashMap中的红黑树代码作者实在没力气看了,因此这篇文章不涉及内部红黑树分析
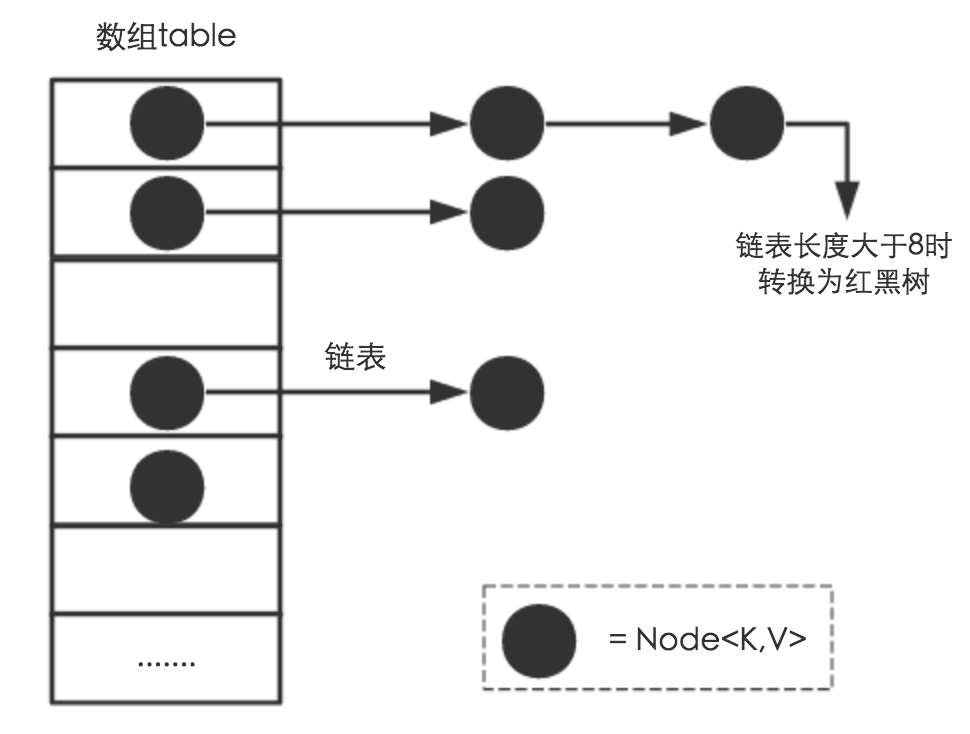
该篇文章纯粹是作者个人观点,并非官方权威,阅读请勿迷信数据结构 hashmap使用数组+链表(红黑树)作为整体结构节点数据结构 一般情况下,节点会使用如下代码构建结构,该结构为单链表 1 2 3 4 5 6 7 8 9 10 11 12 13 14 15 static class Node <K,V> implements Map .Entry<K,V> { final int hash; final K key; V value; Node<K,V> next; Node(int hash, K key, V value, Node<K,V> next) { this .hash = hash; this .key = key; this .value = value; this .next = next; } ... }
一步一步数据结构-红黑树 1 2 3 4 5 6 7 8 9 10 static final class TreeNode <K,V> extends LinkedHashMap .Entry<K,V> { TreeNode<K,V> parent; TreeNode<K,V> left; TreeNode<K,V> right; TreeNode<K,V> prev; boolean red; TreeNode(int hash, K key, V val, Node<K,V> next) { super (hash, key, val, next); } }
整体结构 图片来源美团技术博客:Java 8系列之重新认识HashMap
数据操作 在初步了解HashMap长相之后,我们可以通过基本操作来了解它的工作过程。
hash与索引计算 HashMap通过Key的hash值找到数组的对应位置,因此我们需要先行了解hash的运算规则,因使用的是key对应对象的hashCode()函数,因此在使用自定义对象作为key时,需格外注意。>>> 右移运算符 ^ 按位异或运算符
1 2 3 4 static final int hash (Object key) { int h; return (key == null ) ? 0 : (h = key.hashCode()) ^ (h >>> 16 ); }
索引计算通过(n - 1) & hash,引用美团技术博客中原文(n即length):
这个方法非常巧妙,它通过h & (table.length -1)来得到该对象的保存位,而HashMap底层数组的长度总是2的n次方,这是HashMap在速度上的优化。当length总是2的n次方时,h& (length-1)运算等价于对length取模,也就是h%length,但是&比%具有更高的效率。
增 &
1 2 3 4 5 6 7 8 9 10 11 12 13 14 15 16 17 18 19 20 21 22 23 24 25 26 27 28 29 30 31 32 33 34 35 36 37 38 39 40 41 42 43 44 45 46 47 48 49 50 51 52 53 54 55 56 57 public V put (K key, V value) { return putVal(hash(key), key, value, false , true ); } final V putVal (int hash, K key, V value, boolean onlyIfAbsent, boolean evict) { Node<K,V>[] tab; Node<K,V> p; int n, i; if ((tab = table) == null || (n = tab.length) == 0 ) n = (tab = resize()).length; if ((p = tab[i = (n - 1 ) & hash]) == null ) tab[i] = newNode(hash, key, value, null ); else { Node<K,V> e; K k; if (p.hash == hash && ((k = p.key) == key || (key != null && key.equals(k)))) e = p; else if (p instanceof TreeNode) e = ((TreeNode<K,V>)p).putTreeVal(this , tab, hash, key, value); else { for (int binCount = 0 ; ; ++binCount) { if ((e = p.next) == null ) { p.next = newNode(hash, key, value, null ); if (binCount >= TREEIFY_THRESHOLD - 1 ) treeifyBin(tab, hash); break ; } if (e.hash == hash && ((k = e.key) == key || (key != null && key.equals(k)))) break ; p = e; } } if (e != null ) { V oldValue = e.value; if (!onlyIfAbsent || oldValue == null ) e.value = value; afterNodeAccess(e); return oldValue; } } ++modCount; if (++size > threshold) resize(); afterNodeInsertion(evict); return null ; }
删 1 2 3 4 5 6 7 8 9 10 11 12 13 14 15 16 17 18 19 20 21 22 23 24 25 26 27 28 29 30 31 32 33 34 35 36 37 38 39 40 41 42 43 44 45 46 47 48 49 50 51 52 53 54 55 56 57 58 public V remove (Object key) { Node<K,V> e; return (e = removeNode(hash(key), key, null , false , true )) == null ? null : e.value; } final Node<K,V> removeNode (int hash, Object key, Object value, boolean matchValue, boolean movable) { Node<K,V>[] tab; Node<K,V> p; int n, index; if ((tab = table) != null && (n = tab.length) > 0 && (p = tab[index = (n - 1 ) & hash]) != null ) { Node<K,V> node = null , e; K k; V v; if (p.hash == hash && ((k = p.key) == key || (key != null && key.equals(k)))) node = p; else if ((e = p.next) != null ) { if (p instanceof TreeNode) node = ((TreeNode<K,V>)p).getTreeNode(hash, key); else { do { if (e.hash == hash && ((k = e.key) == key || (key != null && key.equals(k)))) { node = e; break ; } p = e; } while ((e = e.next) != null ); } } if (node != null && (!matchValue || (v = node.value) == value || (value != null && value.equals(v)))) { if (node instanceof TreeNode) ((TreeNode<K,V>)node).removeTreeNode(this , tab, movable); else if (node == p) tab[index] = node.next; else p.next = node.next; ++modCount; --size; afterNodeRemoval(node); return node; } } return null ; }
查 1 2 3 4 5 6 7 8 9 10 11 12 13 14 15 16 17 18 19 20 21 22 23 24 25 26 27 28 29 public V get (Object key) { Node<K,V> e; return (e = getNode(hash(key), key)) == null ? null : e.value; } final Node<K,V> getNode (int hash, Object key) { Node<K,V>[] tab; Node<K,V> first, e; int n; K k; if ((tab = table) != null && (n = tab.length) > 0 && (first = tab[(n - 1 ) & hash]) != null ) { if (first.hash == hash && ((k = first.key) == key || (key != null && key.equals(k)))) return first; if ((e = first.next) != null ) { if (first instanceof TreeNode) return ((TreeNode<K,V>)first).getTreeNode(hash, key); do { if (e.hash == hash && ((k = e.key) == key || (key != null && key.equals(k)))) return e; } while ((e = e.next) != null ); } } return null ; }
小结 所有操作在需要对链表进行判断的情况下,在JDK8中,都是先判断头结点,再判断是否存在后续节点,然后红黑树交由红黑树内部方法处理,单链表遍历通过do{}while进行循环遍历。对比JDK1.7我们可以看出代码变化
1 2 3 4 5 6 7 8 9 10 11 12 13 14 15 16 17 18 19 20 21 22 23 24 25 26 27 28 public V get (Object key) { if (key == null ) return getForNullKey(); Entry<K,V> entry = getEntry(key); return null = = entry ? null : entry.getValue(); } private V getForNullKey () { for (Entry<K,V> e = table[0 ]; e != null ; e = e.next) { if (e.key == null ) return e.value; } return null ; } final Entry<K,V> getEntry (Object key) { int hash = (key == null ) ? 0 : hash(key); for (Entry<K,V> e = table[indexFor(hash, table.length)]; e != null ; e = e.next) { Object k; if (e.hash == hash && ((k = e.key) == key || (key != null && key.equals(k)))) return e; } return null ; }
JDK7中,因为没有引入红黑树优化,因此链表都为单链表,因此遍历都是通过for循环,后续节点非空判断也在for循环的判断条件中。因此,此处个人 大胆总结,该变化由红黑树引起。可能由于instanceof存在一定程度的性能损耗,因此,先进行首节点判断以尽可能的避免首节点就是所寻节点从而不用使用instanceof可以提升一定程度的性能(存在争议)。
自动扩容 HashMap的创建 1 2 3 4 5 6 7 8 9 10 11 12 13 14 15 16 17 18 19 20 21 22 23 24 25 26 27 28 29 public HashMap (int initialCapacity, float loadFactor) { if (initialCapacity < 0 ) throw new IllegalArgumentException ("Illegal initial capacity: " + initialCapacity); if (initialCapacity > MAXIMUM_CAPACITY) initialCapacity = MAXIMUM_CAPACITY; if (loadFactor <= 0 || Float.isNaN(loadFactor)) throw new IllegalArgumentException ("Illegal load factor: " + loadFactor); this .loadFactor = loadFactor; this .threshold = tableSizeFor(initialCapacity); } public HashMap (int initialCapacity) { this (initialCapacity, DEFAULT_LOAD_FACTOR); } public HashMap () { this .loadFactor = DEFAULT_LOAD_FACTOR; } public HashMap (Map<? extends K, ? extends V> m) { this .loadFactor = DEFAULT_LOAD_FACTOR; putMapEntries(m, false ); }
以上创建HashMap的方式中,需要注意指定初始容量的函数,两者都会执行this.threshold = tableSizeFor(initialCapacity);这段代码将会将使用者指定的容量转化为2的整数次方数,举例说明tableSizeFor(11)将会返回16,tableSizeFor(17)将会返回32。其内部实现为
1 2 3 4 5 6 7 8 9 10 11 12 static final int tableSizeFor (int cap) { int n = cap - 1 ; n |= n >>> 1 ; n |= n >>> 2 ; n |= n >>> 4 ; n |= n >>> 8 ; n |= n >>> 16 ; return (n < 0 ) ? 1 : (n >= MAXIMUM_CAPACITY) ? MAXIMUM_CAPACITY : n + 1 ; }
他人解释 ,根据该解释,再加上程序语言一般情况下int最大值为2147483647,转化为二进制是32位,而1+2+4+8+16=31,因此基本可以认定只要传入int不是非法,都会被该函数运算处理,此时需要注意static final int MAXIMUM_CAPACITY = 1 << 30;该函数限定了最大值。
HashMap的索引计算 之前查看put源码时,很容易看出索引位置由(n - 1) & hash算出,其中n为当前数组容量长度。&是按位与运算,我简易模拟下hash为48和1568时的运算:
1 2 3 4 5 6 7 8 9 10 11 12 48-> 0000 0000 0000 0000 0000 0000 0011 0000 15-> 0000 0000 0000 0000 0000 0000 0000 1111 & 0000 0000 0000 0000 0000 0000 0000 0000 -> 0 1568-> 0000 0000 0000 0000 0000 0110 0010 0000 15-> 0000 0000 0000 0000 0000 0000 0000 1111 & 0000 0000 0000 0000 0000 0000 0000 0000 -> 0 Tips:48为字符串"0"的hash值,1568为字符串"11"的hash值 因为&运算的特性,仅有1&1的结果才为1,因此n-1的值限定了计算&的长度 当前例子中仅仅计算最后四位,因为前面的所有都是0,无需考虑
HashMap的扩容 扩容由++size > threshold触发,因此我使用如下代码进行简易的触发扩容,并且确保至少有一条单链表存在一个以上的节点。
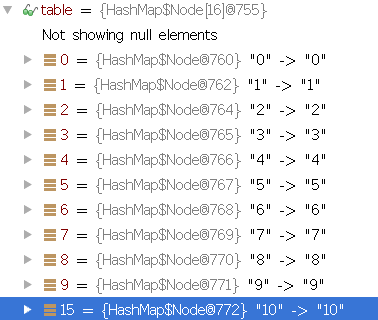
1 2 3 4 5 6 HashMap<String, Integer> test = new HashMap <String, Integer>(); for (int i = 0 ; i < 13 ; i++) { test.put(String.valueOf(i), i); }
11 个数据,因此当前size为11,此时满足++size > threshold条件,触发扩容,容量会由newThr = oldThr << 1; // double threshold扩大一倍(即原来的两倍),因为容量的扩大,计算索引时的公式(n - 1) & hash,此时n-1的二进制肯定比之前多一位,因此节点的位置需要重新计算。而根据函数tableSizeFor我们可知,基本上所有的HashMap的容量都是2的整数次方数。因此可以看如下过程(以初始容量为16举例)
1 2 3 4 5 6 7 原始内容 hash值 hash值的二进制 与15 &结果 与31 &结果 0 48 0000 0000 0000 0000 0000 0000 0011 0000 0 16 11 1568 0000 0000 0000 0000 0000 0110 0010 0000 0 0 ----------------------------------------------------------- n-1 =15 (非hash值!) 0000 0000 0000 0000 0000 0000 0000 1111 n^2 -1 =31 0000 0000 0000 0000 0000 0000 0001 1111 Tip:对不齐我也没办法,我也很难受,将就看吧
可以轻易看出,元素是否需要转移位置取决于新增的那一位是1还是0,因此和n进行&运算即可得知,为0即保留位置无需移动,为1则代表需要移动n个位置。
1 2 3 4 5 6 7 8 9 10 11 12 13 14 15 16 17 18 19 20 21 22 23 24 25 26 27 28 29 30 31 32 33 34 35 36 37 38 39 40 41 42 43 44 45 46 47 48 49 50 51 52 53 54 55 56 57 58 59 60 61 62 63 64 65 66 67 68 69 70 71 72 73 final Node<K,V>[] resize() { Node<K,V>[] oldTab = table; int oldCap = (oldTab == null ) ? 0 : oldTab.length; int oldThr = threshold; int newCap, newThr = 0 ; if (oldCap > 0 ) { if (oldCap >= MAXIMUM_CAPACITY) { threshold = Integer.MAX_VALUE; return oldTab; } else if ((newCap = oldCap << 1 ) < MAXIMUM_CAPACITY && oldCap >= DEFAULT_INITIAL_CAPACITY) newThr = oldThr << 1 ; } else if (oldThr > 0 ) newCap = oldThr; else { newCap = DEFAULT_INITIAL_CAPACITY; newThr = (int )(DEFAULT_LOAD_FACTOR * DEFAULT_INITIAL_CAPACITY); } if (newThr == 0 ) { float ft = (float )newCap * loadFactor; newThr = (newCap < MAXIMUM_CAPACITY && ft < (float )MAXIMUM_CAPACITY ? (int )ft : Integer.MAX_VALUE); } threshold = newThr; @SuppressWarnings({"rawtypes","unchecked"}) Node<K,V>[] newTab = (Node<K,V>[])new Node [newCap]; table = newTab; if (oldTab != null ) { for (int j = 0 ; j < oldCap; ++j) { Node<K,V> e; if ((e = oldTab[j]) != null ) { oldTab[j] = null ; if (e.next == null ) newTab[e.hash & (newCap - 1 )] = e; else if (e instanceof TreeNode) ((TreeNode<K,V>)e).split(this , newTab, j, oldCap); else { Node<K,V> loHead = null , loTail = null ; Node<K,V> hiHead = null , hiTail = null ; Node<K,V> next; do { next = e.next; if ((e.hash & oldCap) == 0 ) { if (loTail == null ) loHead = e; else loTail.next = e; loTail = e; } else { if (hiTail == null ) hiHead = e; else hiTail.next = e; hiTail = e; } } while ((e = next) != null ); if (loTail != null ) { loTail.next = null ; newTab[j] = loHead; } if (hiTail != null ) { hiTail.next = null ; newTab[j + oldCap] = hiHead; } } } } } return newTab; }
我挑出两部分着重看一下
1 2 3 4 if (e.next == null ) newTab[e.hash & (newCap - 1 )] = e;
1 2 3 4 5 6 7 8 9 10 11 12 13 14 15 16 if ((e.hash & oldCap) == 0 ) { if (loTail == null ) loHead = e; else loTail.next = e; loTail = e; } else { if (hiTail == null ) hiHead = e; else hiTail.next = e; hiTail = e; }
以上两段代码可以清晰看出无论当前索引位置的链表仅有一个节点还是多个,都会进行&计算,因此美团关于HashMap 的文章中有这么一段
这个设计确实非常的巧妙,既省去了重新计算hash值的时间,而且同时,由于新增的1bit是0还是1可以认为是随机的,因此resize的过程,均匀的把之前的冲突的节点分散到新的bucket了。这一块就是JDK1.8新增的优化点。有一点注意区别,JDK1.7中rehash的时候,旧链表迁移新链表的时候,如果在新表的数组索引位置相同,则链表元素会倒置,但是从上图可以看出,JDK1.8不会倒置。有兴趣的同学可以研究下JDK1.8的resize源码,写的很赞,如下:
同时我们对比JDK7中扩容迁移的源码来看
1 2 3 4 5 6 7 8 9 10 11 12 13 14 15 void transfer (Entry[] newTable, boolean rehash) { int newCapacity = newTable.length; for (Entry<K,V> e : table) { while (null != e) { Entry<K,V> next = e.next; if (rehash) { e.hash = null == e.key ? 0 : hash(e.key); } int i = indexFor(e.hash, newCapacity); e.next = newTable[i]; newTable[i] = e; e = next; } } }
此时,我们观察源码得知,的确省去重新计算hash值的时间,不过链表元素会产生倒置是因为JDK7中put使用的是头插法。因此,个人在此猜测,当链表超过一个节点时不直接使用newTab[e.hash & (newCap - 1)] = e;是为了避免索引一致时的尾插法的链表遍历(链表插入删除操作快,查询满;而数组查询快,删除插入操作稍慢),使用第二段代码明显可以减少一次单链表的遍历。
 本质上,在一般情况下的HashMap就是一维数组+单链表,其中一维数组在这里的作用个人感觉更像是指针,当用户通过`get`获取值的时候,先通过hash找到对应数组位置,再通过数组找到对应的链表,再进行链表遍历找到完全符合的**键值节点**